Your cart is currently empty!
Demystifying the Intervalometer
Planning the Concept
How to take family selfies with a DSLR camera using the built-in interval timer

This was a super fun shoot and something we’ve been discussing over the last few months for a family holiday card. We really wanted to do a Christmas morning type of theme with everyone in the same pajamas. Since I wanted to be in the photo, the challenge in this case was putting it all together without another photographer. This is where using the interval timer to do a family selfie saved the day.
Conceptually, this is a fairly easy shoot to do . . . unless you also want to be in the photo. I thought about compositing myself in, but I was worried about incorrectly positioning myself. If not done perfectly, it would look like an obvious composite. I also considered using a remote or the canon app on my phone to trigger the camera. This might be fine for a landscape shot, but we have two kids under 3 years old.
If you have kids, you can appreciate that it takes a lot of photos to actually get one that works!
THEN IT’S TIME TO
Getting Your Camera to be the Photographer
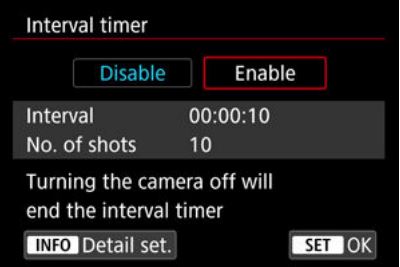
Dial Up the Interval Timer
I took advantage of a concept used in time-lapse photography by using the interval timer for our family selfie. My non-photographer wife reminded me of this concept as I was flummoxed with how to take and be in the photo. It seems she had been attentively listening when I mentioned my time-lapse fascination every time we watched the House of Cards opening scene on Netflix.
Using my Canon R5, I took advantage of a feature called the intervalometer (or interval timer). Essentially, I specified the number of pictures and duration between shots. This was completely arbitrary and only limited by the camera buffer, so I picked 60 shots. Therefore, I placed my camera on a tripod and set the interval to 1 second between shots.
At this point, I just had to press the button and the camera would then fire off 60 shots per min (did I mention it takes A LOT with young kids?).
*Many newer cameras have this feature. If your’s doesn’t, you can get an external trigger. For example, there is a company named Pluto that makes a really amazing one capable of this and much more.
The Equipment
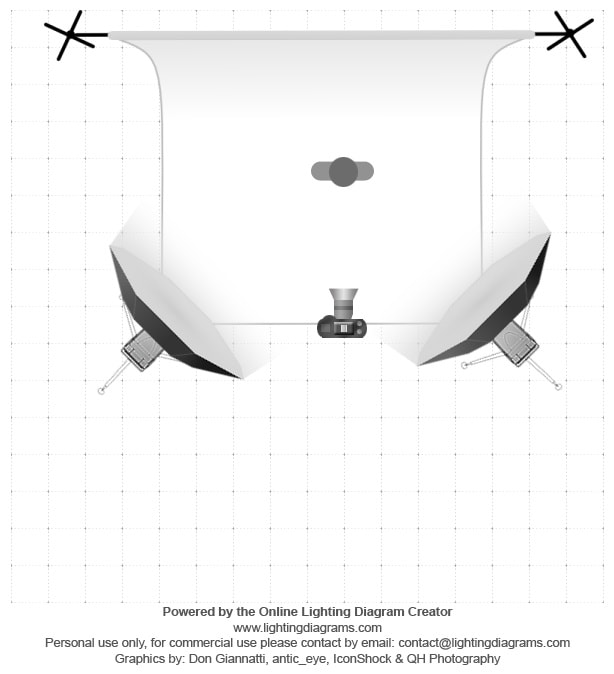
For lighting our family selfie with the interval timer, we used two sources–an AD600 and two AD200s in tandem. We wanted a morning look but it was about 5 PM, which isn’t a problem when you can control the light.
We used two Magbox softboxes from MagMod to provide the overall light using crosslighting. For the technical specifics, I shot with a white balance of 4000K. I also used a 1/2 CTO gel to balance the light temperature between the cool light of a flash and the warm light from the room.
Rapid Fire Flash Considerations
One other technical consideration when shooting so rapidly is that a flash can only fire so quickly. If you’ve ever heard the pop of your flash at full power, you appreciate the awesomeness of the light surge but the frustration of waiting for it to refresh again.
Knowing your equipment, however, enables you to get around this to your advantage. The AD200 has a recycle time of 0.01 (lowest power) to 2.1 sec (full power). I needed the flashes to pop about every second, so I knew that I couldn’t use full power. If fact, I wanted to use the least amount of power to minimize the recycle time as much as possible, so I picked 1/64th.
Unfortunately, this leaves everything too dark. With this in mind, I had to adjust my camera settings to brighten the exposure again.
Getting it Just Right with Camera Settings
This left me with the decision of what to do next among 3 primary options:
Change the aperture: I could open up the aperture to something like 2.0, however I needed everyone in focus (four people and two dogs don’t really work at 2.0)
Shutter speed: Worthwhile thought, but shutter speed mainly affects the ambient light. When thinking about flash and the exposure triangle, ISO and aperture are the key players.
Change the ISO: Bingo–I increased the ISO to about 800. I have 15 years shooting landscape photography, so I’m intrinsically nervous shooting above ISO 100 (I’m gradually working through it …) but this was the best move.
Now the subjects in front of the flash look great but the ambient light is far too bright
Hmm . . . problem time but an opportunity to work through this. I’ve already changed flash power (needs to be low for fast recycle time) and ISO, so I have two more options:
Adjust the aperture: Remember the thing about keeping two kids and two dogs in focus? Can’t do much here.
Change the shutter speed: Since shutter speed doesn’t really affect flash, I just dialed it down low enough until I found the perfect exposure for everything not lit by the flash.
Putting the Recipe Together
Voilà
I now had the recipe to attain completely automated family portraits while also using flash. We had the ambient light ideally adjusted, had 60 shots each time I pressed the shutter, and had flash settings that would keep up with such a demanding pace.

With two dogs and two wild but loveable kids, we needed all 540 images to get the right one for the Christmas card this year. I’m sure glad I didn’t have to press the button on all of those!


Follow me.
Instagram is where I tell stories of daily life and love. Step into my world.
For all the latest, click below!
Adventure is everywhere
Every click is a story–see through the lens of my life!